Controllers
A controller is a higher-level tool computing the motion of a body from what your application asks for, rather than
leaving it entirely to the forces of the simulation. Rapier provides the following controllers, each being an object
owned by your application: it is allocated by its New function (e.g. r3NewPidController) and must be freed by its
Free function (e.g. r3FreePidController):
- The character controller, moving a kinematic body along the obstacles of the scene.
- The vehicle controller, driving a car-like body on ray-casted wheels (only available in 3D).
- The PID controller, steering a dynamic body toward a target pose at the velocity level.
Character controller
Most games involve bodies behaving in ways that defy the laws of physics: floating platforms, elevators, playable characters, etc. This is why kinematic bodies exist: they offer a total control over the body’s trajectory since they are completely immune to forces or impulses (like gravity, contacts, joints).
But this control comes at a price: it is up to the user to take any obstacle into account by running custom collision-detection operations manually and update the trajectory accordingly. This can be very difficult. Detecting obstacles usually rely on ray-casting or shape-casting, used to adjust the trajectory based on the potential contact normals. Often, multiple ray or shape-casts are needed, and the trajectory adjustment code isn’t straightforward.
The Kinematic Character Controller (which we will abbreviate to character controller) is a higher-level tool that will emit the proper ray-casts and shape-casts to adjust the user-defined trajectory based on obstacles. The well-known move-and-slide operation is the main feature of a character controller.
Despite its name, a character controller can also be used for moving objects that are not characters. For example, a character controller may be used to move a platform. In the rest of this guide, we will use the word character to designate whatever you would like to move using the character controller.
Rapier provides a built-in general-purpose character controller implementation. It allows you to easily:
- Stop at obstacles.
- Slide on slopes that are not to steep.
- Climb stairs automatically.
- Walk over small obstacles.
- Interact with moving platforms.
Despite the fact that this built-in character controller is designed to be generic enough to serve as a good starting point for many common use-cases, character-control (especially for the player’s character itself) is often very game-specific. Therefore the builtin character controller may not work perfectly out-of-the-box for all game types.
Setup and usage
The character controller implementation is exposed as the R3KinematicCharacterController object, created with its
default configuration by r3NewKinematicCharacterController, and freed by r3FreeKinematicCharacterController. This
object only contains information about the character controller’s behavior (as well as the collisions recorded by its
last movement calculation, see the collisions section). It does not contain
any collider-specific or rigid-body-specific information like handles, velocities, positions, etc. Therefore, the same
R3KinematicCharacterController can be used to control multiple rigid-bodies/colliders if they rely on the same set
of parameters. Its behavior is configured by its setters (detailed in the next sections), and it is used through the
following functions:
r3KinematicCharacterController_MoveShapeis responsible for calculating the possible movement of a character based on the desired movement, obstacles, and character controller options. It is given the world containing the obstacles, theR3QueryOptionsselecting these obstacles (see the filtering section), the timestep length, the shape of the character, and its current pose. The character’s shape is anR3SharedShape, e.g., created withr3BallSharedShapeor cloned from a collider withr3Collider_CloneShape(and freed withr3FreeSharedShapeonce it is no longer needed).r3KinematicCharacterController_Collisionsandr3KinematicCharacterController_SolveCharacterCollisionImpulsesare detailed in the collisions section.
- Example 2D
- Example 3D
// The translation we would like to apply if there were no obstacles.
R2Vector desired_translation = r2Vector(1.0, -2.0);
// Create the character controller, here with the default configuration.
R2KinematicCharacterController *character_controller = r2NewKinematicCharacterController();
// Init the query options.
R2QueryOptions options = r2DefaultQueryOptions();
// Make sure the character we are trying to move isn't considered an obstacle.
options.filter.exclude_rigid_body = rigid_body_handle;
// Calculate the possible movement.
R2CharacterMovement corrected_movement = r2KinematicCharacterController_MoveShape(
    world,                // The world containing the obstacles.
    &options,             // The query options (NULL for the default ones).
    character_controller, // The character controller.
    dt,                   // The timestep length (can be set to r2TimeStep(world)).
    character_shape,      // The character's shape.
    character_pos,        // The character's initial position.
    desired_translation);

// TODO: apply the `corrected_movement.translation` to the rigid-body or collider based on the rules described below.

// Free the character controller once it is no longer needed.
r2FreeKinematicCharacterController(character_controller);
// The translation we would like to apply if there were no obstacles.
R3Vector desired_translation = r3Vector(1.0, -2.0, 3.0);
// Create the character controller, here with the default configuration.
R3KinematicCharacterController *character_controller = r3NewKinematicCharacterController();
// Init the query options.
R3QueryOptions options = r3DefaultQueryOptions();
// Make sure the character we are trying to move isn't considered an obstacle.
options.filter.exclude_rigid_body = rigid_body_handle;
// Calculate the possible movement.
R3CharacterMovement corrected_movement = r3KinematicCharacterController_MoveShape(
    world,                // The world containing the obstacles.
    &options,             // The query options (NULL for the default ones).
    character_controller, // The character controller.
    dt,                   // The timestep length (can be set to r3TimeStep(world)).
    character_shape,      // The character's shape.
    character_pos,        // The character's initial position.
    desired_translation);

// TODO: apply the `corrected_movement.translation` to the rigid-body or collider based on the rules described below.

// Free the character controller once it is no longer needed.
r3FreeKinematicCharacterController(character_controller);
The obstacles are taken at the positions they had at the end of the last r3Step (or r3DetectCollisions). The
returned R3CharacterMovement contains the corrected movement (its translation field), as well as whether the
character touches the ground at its final position (its grounded field), and whether it is sliding down a slope that
is too steep to climb (its is_sliding_down_slope field). The corrected movement isn’t applied automatically: the
recommended way to update the character’s position depends on its representation:
- A collider not attached to any rigid-body: set the collider’s position directly (with
r3Collider_SetTranslation) to the corrected movement added to its current position. - A velocity-based kinematic rigid-body: set its velocity (with
r3RigidBody_SetLinvel) to the computed movement divided by the timestep length. - A position-based kinematic rigid-body: set its next kinematic position (with
r3RigidBody_SetNextKinematicTranslation) to the corrected movement added to its current position.
The character’s shape may be any shape supported by Rapier. However, it is recommended to either use a cuboid, a ball, or a capsule since they involve less computations and less numerical approximations.
The built-in character controller does not support rotational movement. It only supports translations.
Character offset
For performance and numerical stability reasons, the character controller will attempt to preserve a small gap between
the character shape and the environment. This small gap is named offset and acts as a small margin around the character
shape. A good value for this offset is something sufficiently small to make the gap unnoticeable, but sufficiently large
to avoid numerical issues (if the character seems to get stuck inexplicably, try increasing the offset).

The offset is set with r3KinematicCharacterController_SetOffset. Like every length of the character controller, it
is given as an R3CharacterLength: its value is either an absolute length (if its relative field is 0), or a
factor multiplied by the height of the character’s shape (if its relative field is 1). The current offset is
given by r3KinematicCharacterController_Offset.
// The character offset is set to 0.01.
r2KinematicCharacterController_SetOffset(character_controller,
                                         (R2CharacterLength){.value = 0.01, .relative = 0});
// The character offset is set to 0.01 multiplied by the shape's height.
r2KinematicCharacterController_SetOffset(character_controller,
                                         (R2CharacterLength){.value = 0.01, .relative = 1});
If the character still gets stuck when sliding against surfaces, the small distance by which its motion is pushed
along the normals of the obstacles hit can also be increased with r3KinematicCharacterController_SetNormalNudgeFactor
(too large values cause bumps when sliding on a flat ground).
It is not recommended to change the offset after the creation of the character controller.
Up vector
The up vector instructs the character controller of what direction should be considered vertical. The horizontal plane is the plane orthogonal to this up vector. There are two equivalent ways to evaluate the slope of the floor: by taking the angle between the floor and the horizontal plane (in 2D), or by taking the angle between the up-vector and the normal of the floor (in 2D and 3D). By default, the up vector is the positive y axis, but it can be modified to be any (unit) vector that suits the application.

The up vector is set with r3KinematicCharacterController_SetUp (it is normalized automatically), and read with
r3KinematicCharacterController_Up:
// Set the up-vector to the positive X axis.
r2KinematicCharacterController_SetUp(character_controller, r2Vector(1.0, 0.0));
Slopes
If sliding is enabled, the character can automatically climb slopes if they are not too steep, or slide down slopes if they are too steep. Sliding is configured by the following parameters:
- The max slope climb angle: if the angle between the slope to climb and the horizontal floor is larger than this value, then the character won’t be able to slide up this slope.
- The min slope slide angle: if the angle between the slope and the horizontal floor is smaller than this value, then the vertical component of the character’s movement won’t result in any sliding.
As always in Rapier, angles are specified in radians.
Both angles are set at once with r3KinematicCharacterController_SetSlopes. Sliding itself is enabled by default, and
can be disabled with r3KinematicCharacterController_SetSlide. The current slope angles and sliding setting can be read
with r3KinematicCharacterController_Settings.
r2KinematicCharacterController_SetSlopes(
    character_controller,
    // Don't allow climbing slopes larger than 45 degrees.
    45.0 * R2_PI / 180.0,
    // Automatically slide down on slopes smaller than 30 degrees.
    30.0 * R2_PI / 180.0);
Stairs and small obstacles
If enabled, the autostep setting allows the character to climb stairs automatically and walk over small obstacles. Autostepping requires the following parameters:
- The maximum height the character can step over. If the vertical movement needed to step over this obstacle is larger than this value, then the character will be stopped by the obstacle.
- The minimum (horizontal) width available on top of the obstacle. If, after the character is teleported on top of the obstacle, it cannot move forward by a distance larger than this minimum width, then the character will just be stopped by the obstacle (without being moved to the top of the obstacle).
- Whether or not autostepping is enabled for dynamic bodies. If it is not enabled for dynamic bodies, the character won’t attempt to automatically step over small dynamic bodies. Disabling this can be useful if we want the character to push these small objects (see collisions) instead of just stepping over them.
The following depicts (top) one configuration where all the autostepping conditions are satisfied, and, (bottom) two configurations where these conditions are not all satisfied (left: because the width of the step is too small, right: because the height of the step is too large):
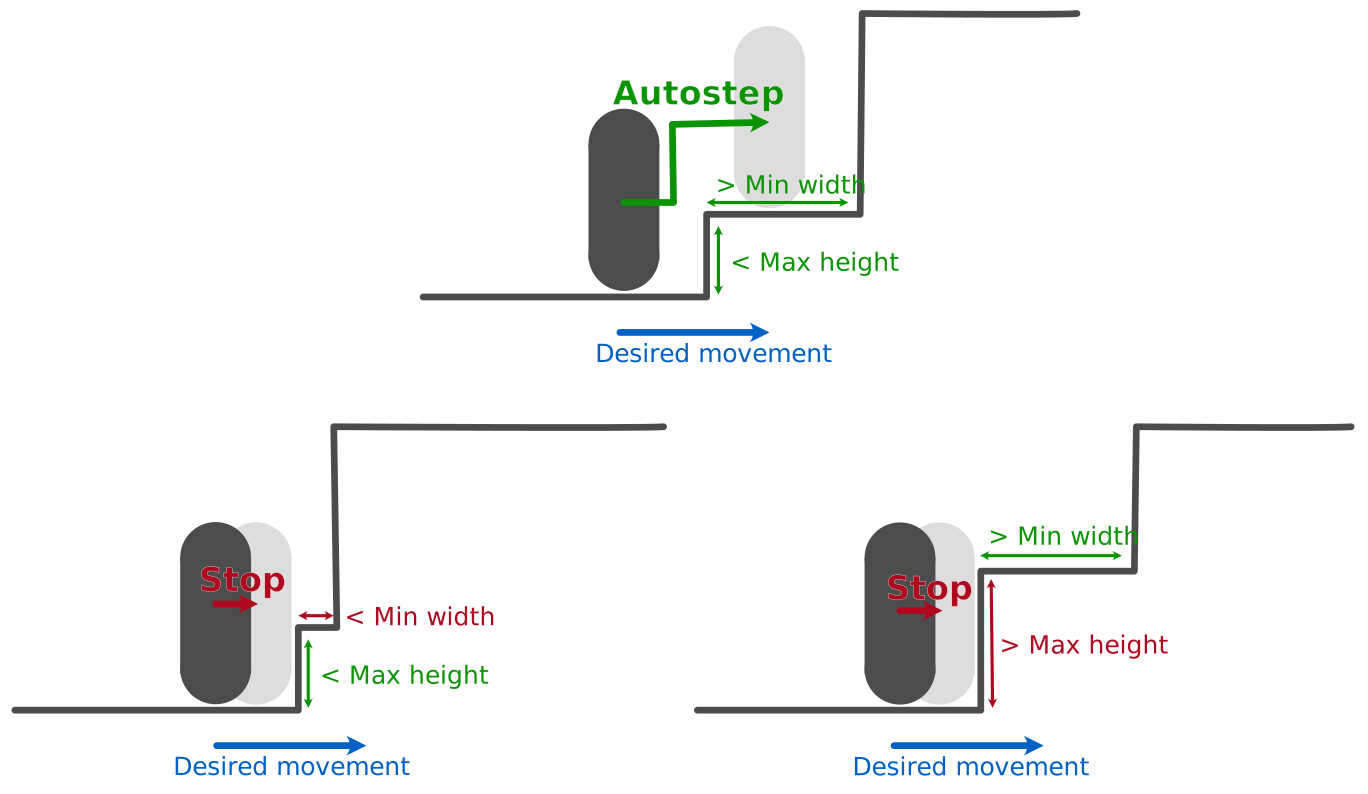
Autostepping will only activate if the character is touching the floor right before the obstacle. This prevents the player from being teleported on to of a platform while it is in the air.
Autostepping is configured with r3KinematicCharacterController_SetAutostep, which takes whether it is enabled, the
maximum height and minimum width (both as R3CharacterLength, see the
character offset), and whether it is enabled for dynamic bodies. The
current settings are given by r3KinematicCharacterController_Autostep as an R3CharacterAutostep structure:
// Set `enabled` (the second argument) to 0 to disable autostep (the other arguments are then ignored).
r2KinematicCharacterController_SetAutostep(character_controller, 0, (R2CharacterLength){0},
                                           (R2CharacterLength){0}, 0);
// Autostep if the step height is smaller than 0.5, and its width larger than 0.2.
r2KinematicCharacterController_SetAutostep(
    character_controller, 1,
    (R2CharacterLength){.value = 0.5, .relative = 0}, // The maximum height.
    (R2CharacterLength){.value = 0.2, .relative = 0}, // The minimum width.
    1);                                               // Include dynamic bodies.
// Autostep if the step height is smaller than 0.3 multiplied by the character's height,
// and its width larger than 0.5 multiplied by the character's width (i.e. half the character's
// width).
r2KinematicCharacterController_SetAutostep(
    character_controller, 1,
    (R2CharacterLength){.value = 0.3, .relative = 1}, // The maximum height.
    (R2CharacterLength){.value = 0.5, .relative = 1}, // The minimum width.
    1);                                               // Include dynamic bodies.
Snap-to-ground
If enabled, snap-to-ground will force the character to stick to the ground if the following conditions are met simultaneously:
- At the start of the movement, the character touches the ground.
- The movement has a slight downward component.
- At the end of the desired movement, the character would be separated from the ground by a distance smaller than the distance provided by the snap-to-ground parameter.
If these conditions are met, the character is automatically teleported down to the ground at the end of its motion. Typical usages of snap-to-ground include going downstairs or remaining in contact with the floor when moving downhill.

Snap-to-ground is configured with r3KinematicCharacterController_SetSnapToGround, which takes whether it is enabled,
and the snapping distance as an R3CharacterLength (see the character offset):
// Set `enabled` (the second argument) to 0 to disable snap-to-ground (the distance is then ignored).
r2KinematicCharacterController_SetSnapToGround(character_controller, 0, (R2CharacterLength){0});
// Snap to the ground if the vertical distance to the ground is smaller than 0.5.
r2KinematicCharacterController_SetSnapToGround(character_controller, 1,
                                               (R2CharacterLength){.value = 0.5, .relative = 0});
// Snap to the ground if the vertical distance to the ground is smaller than 0.2 times the character's height.
r2KinematicCharacterController_SetSnapToGround(character_controller, 1,
                                               (R2CharacterLength){.value = 0.2, .relative = 1});
Filtering
It is possible to let the character controller ignore some obstacles. This is achieved by configuring the options
argument (an R3QueryOptions, initialized by r3DefaultQueryOptions) of r3KinematicCharacterController_MoveShape.
This structure is detailed in the scene query filters section:
- The
flagsfield of itsfilterallows you to exclude whole families of obstacles (e.g. all the colliders attached to dynamic rigid-bodies withR3_QUERY_EXCLUDE_DYNAMIC). - The
use_groupsandgroupsfields of itsfilterallow you to filter based on the colliders collision groups. - The
exclude_colliderandexclude_rigid_bodyfields of itsfilterexclude one collider, and all the colliders attached to one rigid-body. - Its
predicatefield is an optional callback to filter-out colliders based on user-defined rules. It is given theuserDatafield of the options, a read-only access to the world (anR3ReadContext), and the handle of each collider, and returns a nonzero value to keep that collider as an obstacle.
If the character-controller is used to move a collider (and the rigid-body it may be attached to) that is present
in the physics scene, the filters must be used to exclude that collider (and that rigid-body) from the set of
obstacles (with the exclude_collider and exclude_rigid_body fields of the filter) to prevent the character from
colliding with itself.
Collisions
As the character moves along its path, it will hit grounds and obstacles before sliding or stepping on them. Knowing what collider was hit on this path, and where the hit took place, can be valuable to apply various logic (custom forces, sound effects, etc.) This is why a set of character collision events are collected during the calculation of its trajectory.
The character collision events are given in chronological order. For example, if, during the resolution of the character motion, the character hits an obstacle A, then slides against it, and then hits another obstacle B. The collision with A will be reported first, and the collision with B will be reported second.
The character collisions are recorded by the character controller during each call to
r3KinematicCharacterController_MoveShape, and remain available until its next call. They are copied into a buffer of
R3CharacterCollision with r3KinematicCharacterController_Collisions (call it once with a NULL buffer and a zero
capacity to get the number of collisions, then a second time to copy them):
R2KinematicCharacterController *character_controller = r2NewKinematicCharacterController();
// The collisions are recorded by the controller while the character is being moved.
r2KinematicCharacterController_MoveShape(world, &options, character_controller, dt,
                                         character_shape, character_pos,
                                         desired_translation);
// Read them after the movement (they remain available until the next movement
// calculation of this controller).
size_t num_collisions = r2KinematicCharacterController_Collisions(character_controller, NULL, 0);
R2CharacterCollision *collisions = malloc(num_collisions * sizeof(R2CharacterCollision));
r2KinematicCharacterController_Collisions(character_controller, collisions, num_collisions);
for (size_t k = 0; k < num_collisions; k++) {
    R2CharacterCollision collision = collisions[k];
    /* Handle the collision with the collider `collision.collider`. */
    (void)collision;
}
free(collisions);
Each collision gives the handle of the collider hit, the pose of the character at the time of the hit
(character_pos), as well as the parts of the desired translation already applied (translation_applied) and
remaining (translation_remaining) at that time. Its hit field has the same form as the result of a
shape-casting: its first witness point and normal are on the obstacle, in
world-space, whereas its second witness point and normal are on the character, in its local-space.
Unless dynamic bodies are filtered-out by the character controller’s filters, they may be hit during the resolution of the character movement. If that happens, these dynamic bodies will generally not react to (i.e. not be pushed by) the character because the character controller’s offset prevents actual contacts from happening.
In these situations forces need to be applied manually to this rigid-bodies. The character controller can apply these forces for you if needed:
// First, calculate the movement, which records all the collisions.
r2KinematicCharacterController_MoveShape(world, &options, character_controller, dt,
                                         character_shape, character_pos,
                                         desired_translation);
// Then, let the character controller solve (and apply) the collision impulses
// to the dynamic rigid-bodies hit along its path. Note that this must be given the
// same shape, timestep length, and query options as the movement calculation.
r2KinematicCharacterController_SolveCharacterCollisionImpulses(
    character_controller, character_shape, dt, character_mass, &options);
The impulses are computed from the collisions recorded by the last r3KinematicCharacterController_MoveShape call
of the character controller, and applied to the rigid-bodies of the world given to that call. The mass of the
character is given explicitly: it can be, for example, the mass of the rigid-body it is attached to (as given by
r3RigidBody_Mass). The R3QueryOptions should be the same as the ones given to the movement calculation. Unlike
r3KinematicCharacterController_MoveShape, this calls the predicate of the options, if any, once for every collider
of the world before applying the impulses, while the world is locked for writing: it may only use the Read
functions of its R3ReadContext.
Gravity
Since you are responsible for providing the movement vector to the character controller at each frame, it is up to you to emulate gravity by adding a downward component to that movement vector.
Vehicle controller
Simulating a car with rigid-bodies and joints, for example using one rigid-body per wheel attached to the chassis by a joint, is
possible but can be difficult to control for games requiring non-realistic vehicles. This is why Rapier provides a
vehicle controller (the current implementation was ported from the btRaycastVehicle of Bullet). The vehicle is a
single rigid-body modeling its chassis, and its wheels are only represented by ray-casts pushing that body along a
spring-like suspension.
The vehicle controller is only available in 3D, i.e., with the r3 functions.
Setup
The chassis is created like any other dynamic rigid-body, and the wheels are added to the controller afterwards. Each
wheel is given its position on the chassis, the direction of its suspension (the direction of its ray-cast), its axle,
the rest length of its suspension, and its radius. The R3WheelTuning shared by the wheels is what makes the vehicle
feel heavy or light by controlling the elastic properties (stiffness and damping) of the suspension, as well as the
grip of the wheels:
The vehicle controller is the R3DynamicRayCastVehicleController object, created by
r3NewDynamicRayCastVehicleController from the handle of the chassis' dynamic rigid-body. It remembers the world of
that rigid-body, so it must be freed with r3FreeDynamicRayCastVehicleController before that world is freed. The
wheels are added with r3DynamicRayCastVehicleController_AddWheel, which returns the index of the new wheel (starting
from zero, in insertion order), and the R3WheelTuning given to each wheel is initialized with r3DefaultWheelTuning:
// The chassis is an ordinary dynamic rigid-body.
const R3Real hw = 0.3;
const R3Real hh = 0.15;
R3RigidBodyDesc chassis_body = r3DynamicRigidBodyDesc();
chassis_body.position.translation = r3Vector(0.0, 1.0, 0.0);
R3RigidBodyHandle chassis_handle = r3InsertRigidBody(world, &chassis_body);
R3ColliderDesc chassis_collider = r3CuboidColliderDesc(r3Vector(hw * 2.0, hh, hw));
chassis_collider.density = 100.0;
r3InsertCollider(chassis_handle, &chassis_collider);

// The tuning shared by the wheels: the suspension and the grip.
R3WheelTuning tuning = r3DefaultWheelTuning();
tuning.suspension_stiffness = 100.0;
tuning.suspension_damping = 10.0;

// The controller must be freed (with r3FreeDynamicRayCastVehicleController) before its world.
R3DynamicRayCastVehicleController *vehicle = r3NewDynamicRayCastVehicleController(chassis_handle);
const R3Vector wheel_positions[4] = {
    {hw * 1.5, -hh, hw},
    {hw * 1.5, -hh, -hw},
    {-hw * 1.5, -hh, hw},
    {-hw * 1.5, -hh, -hw},
};

for (size_t i = 0; i < 4; i++) {
    // The position of the wheel, the direction its suspension pushes along, its axle, the
    // rest length of its suspension, and its radius; all in the local frame of the chassis.
    r3DynamicRayCastVehicleController_AddWheel(vehicle, wheel_positions[i], r3Vector(0.0, -1.0, 0.0),
                                               r3Vector(0.0, 0.0, 1.0), hh, hh / 4.0, &tuning);
}
By default, the vehicle moves forward along the local x axis of the chassis, and its local y axis points
upward. Other axes can be selected with r3DynamicRayCastVehicleController_SetAxes.
Driving the vehicle
A vehicle is driven by giving each of its wheels an engine force, a brake force, and a steering angle. The controller is then updated before each timestep, which is when the ray-casts are made and when the resulting suspension and friction forces are applied to the chassis. It is strongly recommended to exclude the chassis from the ray-casts, otherwise the ray might hit it and be misinterpreted as being the floor.
The engine force, brake, and steering angle of a wheel are set with r3DynamicRayCastVehicleController_SetWheelControls
(from the index of the wheel), and the controller is updated with r3DynamicRayCastVehicleController_UpdateVehicle
before each r3Step. The colliders attached to the chassis are always excluded from the ray-casts, and the other
obstacles can be filtered with the R3QueryOptions given to the update (see the
scene query filters). Note that its predicate callback, if any, is called once
for every collider of the world before the update, while the world is locked for writing: it may only use the Read
functions of its R3ReadContext.
// The wheels are ray-casted against the scene: the chassis itself is always excluded, and
// every other dynamic body is generally excluded from these ray-casts too.
R3QueryOptions options = r3DefaultQueryOptions();
options.filter.flags = R3_QUERY_EXCLUDE_DYNAMIC;

for (int i = 0; i < 200; i++) {
    // The vehicle is driven by setting the steering angle, the engine force, and the brake of
    // its wheels. Here the two front wheels (indices 0 and 1) are the driving and steering ones.
    r3DynamicRayCastVehicleController_SetWheelControls(vehicle, 0, 0.2, 30.0, 0.0);
    r3DynamicRayCastVehicleController_SetWheelControls(vehicle, 1, 0.2, 30.0, 0.0);

    r3DynamicRayCastVehicleController_UpdateVehicle(vehicle, r3TimeStep(world), &options);

    r3Step(world, NULL, NULL);
}

printf("Vehicle speed: %f\n", (double)r3DynamicRayCastVehicleController_CurrentVehicleSpeed(vehicle));
The state of each wheel after an update (whether it touches the floor, the compression of its suspension, its rotation angle, etc.) is readable from the controller. This is what the rendering of the wheels can be based on since there is no actual per-wheel rigid-bodies to read their state from.
The state of the wheels is copied into a buffer of R3WheelState by r3DynamicRayCastVehicleController_Wheels: the
world-space center of each wheel, the world-space directions of its suspension and axle, its rotation angle, the length
and force of its suspension, and its contact with the ground (whether it touches it, the collider touched, and the
world-space contact point and normal). The speed of the vehicle along its forward axis is given by
r3DynamicRayCastVehicleController_CurrentVehicleSpeed.
// The wheels are given in the order they were added to the controller.
R3WheelState wheels[4];
size_t num_wheels = r3DynamicRayCastVehicleController_Wheels(vehicle, wheels, 4);
for (size_t i = 0; i < num_wheels; i++) {
    // The world-space center of the wheel, its current suspension length, rotation angle, etc.
    printf("Wheel %zu: center (%f, %f, %f), suspension length %f, rotation %f, in contact: %u\n", i,
           (double)wheels[i].center.x, (double)wheels[i].center.y, (double)wheels[i].center.z,
           (double)wheels[i].suspension_length, (double)wheels[i].rotation,
           (unsigned)wheels[i].is_in_contact);
}
PID controller
It is generally not recommended to move a rigid-body by setting its pose directly: teleporting it would ignore every obstacle on the way. The recommended alternative is generally to push it with a force (or an impulse) that is strong enough to reach the target. However, pushing with a single constant force/impulse will generally overshoot the target. Thus, ideally, the force or impulse should be carefully selected and updated each frame as the rigid-body gets closer to its target.
This is what a PID controller (Proportional-Integral-Derivative) is designed to calculate: given the target pose, it computes the ideal velocity change bringing the body closer to it. This is the building block of the velocity-based character controllers, but it is useful for anything that must follow a target without being teleported: a dynamic moving platform, an object held by the player, a following camera, etc.
The gains of the controller are what makes it reach its target quickly or smoothly. The proportional gain is applied to the position errors and is usually set to a multiple of the inverse of the timestep length (e.g. for a timestep of seconds). The derivative gain is applied to the velocity errors and is usually set in , where means no damping and means that the velocity errors are corrected within a single timestep.
The PID controller is the R3PidController object, created by r3NewPidController and freed by
r3FreePidController. It is created with a proportional gain of , an integral gain of , and a derivative gain
of , on every coordinate axis (all of them being controlled). Its gains are set per coordinate axis with
r3PidController_SetGains, from an R3PidGains structure (its current gains being given by r3PidController_Gains).
At each frame, r3PidController_RigidBodyCorrection computes the velocity correction bringing a rigid-body closer to
its target pose (and target velocities): it is up to you to add it to the velocities of that rigid-body before the
next r3Step.
The coordinate axes (linear and/or angular) controlled by the controller can be selected in order, for example, to
only control the translations of a body while leaving its rotations to the simulation (with r3PidController_SetAxes, from a combination of the R3_AXES_MASK_* bits, the current ones being given by r3PidController_Axes):
- Example 2D
- Example 3D
// The proportional, integral, and derivative gains of the controller, acting on the linear
// axes only: the body is pushed toward its target without its rotation being controlled.
R2PidController *pid = r2NewPidController();
R2PidGains gains = r2PidController_Gains(pid);
gains.lin_kp = r2Vector(60.0, 60.0);
gains.lin_ki = r2Vector(0.0, 0.0);
gains.lin_kd = r2Vector(0.8, 0.8);
r2PidController_SetGains(pid, gains);
r2PidController_SetAxes(pid, R2_AXES_MASK_LIN_X | R2_AXES_MASK_LIN_Y);
R2Vector target = r2Vector(3.0, 2.0);

for (int i = 0; i < 200; i++) {
    R2Real dt = r2TimeStep(world);
    // The correction is the velocity change bringing the body closer to its target pose.
    R2VelocityCorrection correction = r2PidController_RigidBodyCorrection(
        pid, dt, body_handle,
        r2TranslationPose(target), // The target pose.
        r2Vector(0.0, 0.0),        // The target linear velocity.
        0.0);                      // The target angular velocity.
    R2Vector linvel = r2VectorAdd(r2RigidBody_Linvel(body_handle), correction.linear);
    R2AngVector angvel = r2RigidBody_Angvel(body_handle) + correction.angularVelocity;
    r2RigidBody_SetLinvel(body_handle, linvel, 1);
    r2RigidBody_SetAngvel(body_handle, angvel, 1);

    r2Step(world, NULL, NULL);
}

r2FreePidController(pid);
// The proportional, integral, and derivative gains of the controller, acting on the linear
// axes only: the body is pushed toward its target without its rotation being controlled.
R3PidController *pid = r3NewPidController();
R3PidGains gains = r3PidController_Gains(pid);
gains.lin_kp = r3Vector(60.0, 60.0, 60.0);
gains.lin_ki = r3Vector(0.0, 0.0, 0.0);
gains.lin_kd = r3Vector(0.8, 0.8, 0.8);
r3PidController_SetGains(pid, gains);
r3PidController_SetAxes(pid, R3_AXES_MASK_LIN_X | R3_AXES_MASK_LIN_Y | R3_AXES_MASK_LIN_Z);
R3Vector target = r3Vector(3.0, 2.0, 0.0);

for (int i = 0; i < 200; i++) {
    R3Real dt = r3TimeStep(world);
    // The correction is the velocity change bringing the body closer to its target pose.
    R3VelocityCorrection correction = r3PidController_RigidBodyCorrection(
        pid, dt, body_handle,
        r3TranslationPose(target), // The target pose.
        r3Vector(0.0, 0.0, 0.0),   // The target linear velocity.
        r3Vector(0.0, 0.0, 0.0));  // The target angular velocity.
    R3Vector linvel = r3VectorAdd(r3RigidBody_Linvel(body_handle), correction.linear);
    R3AngVector angvel = r3VectorAdd(r3RigidBody_Angvel(body_handle), correction.angularVelocity);
    r3RigidBody_SetLinvel(body_handle, linvel, 1);
    r3RigidBody_SetAngvel(body_handle, angvel, 1);

    r3Step(world, NULL, NULL);
}

r3FreePidController(pid);
The integral part of the controller accumulates the position errors of the previous timesteps, which is what allows it
to compensate a permanent perturbation (e.g. the gravity applied to a hovering body). This is also what makes
r3PidController_RigidBodyCorrection modify the controller, and what has to be reset with
r3PidController_ResetIntegrals whenever the controller is given a target it never had a chance to reach. The
R3PdController is the variant without that integral part: it is a plain structure (initialized by
r3DefaultPdController) that r3PdController_RigidBodyCorrection doesn't modify, and its behavior is generally good
enough for games.